16 February, 2015

Home Improvement For Parents

Or how I learned to stop worrying and love the bomb site. 


The Cardinal Rule: One area of your house cannot be improved without another area being destroyed.

Materials

Creating a materials list for your home improvement project is slightly different when you have kids. Observe:

  • 3 screwdrivers (to replace the ones your kids misplace while playing with them)
  • 16 rolls to masking tape (to keep the kids amused while they aren't losing screwdrivers)
  • 3 large cardboard boxes (for them to stab with screwdrivers)
  • 1 box of assorted reticulation pipe, elbows and tees (to make into guns)
  • Normal project materials 

Schedule

You will also need to add some time to your expected project duration for:
  • Undoing the Gordian Knots that will appear in your tie-down rope.
  • Letting your child help you (this is called bonding)
  • Re-doing the part your child helped you with while they aren't looking (this is called reality)
  • Looking for screwdrivers (this can be avoided by budgeting for their replacement)
  • Performing first aid.
  • Retrieving children stuck in rose bushes. 
  • Retrieving children from atop ladders.
  • Adjudicating 


Make Your Own Padded Lightsabers

A Jedi normally constructs his or her own lightsaber. But if you have lots of little padawans under your care, you might like to make a few less lethal versions for them (complete with padding) so they can practice their stuff without injuring each other too much.

WARNING: These can still cause injury (especially to the eyes etc.) so please make sure your kids exercise their rudimentary empathy skills and not hit each other too aggressively. However for sensible games they are a lot softer than the plastic ones and will also last a lot longer.

Here's what you need:
  • Round pine dowel (19mm diameter)
  • Foam pipe insulation (19mm on the inside). You can find this in the plumbing section of your friendly (or unfriendly) hardware store. 
  • Clear contact
  • Black electrical tape
  • Alfoil
  • Magic tape
  • Permanent marker
  • Cellophane. The one shown here is "metallic cellophane" but normal translucent stuff works just as well because of the alfoil backing. 
How to make them:
1. Use a saw to cut the dowel to the right length. This will depend on how big your kid is. You probably want the blade to be about 1.5 times the length of their arm. Then insert the dowel into the pipe insulation. 
2. Leave about 1 cm of insulation hanging over the end of the dowel. It gives a bit more padding on the end for when they attack each other. 
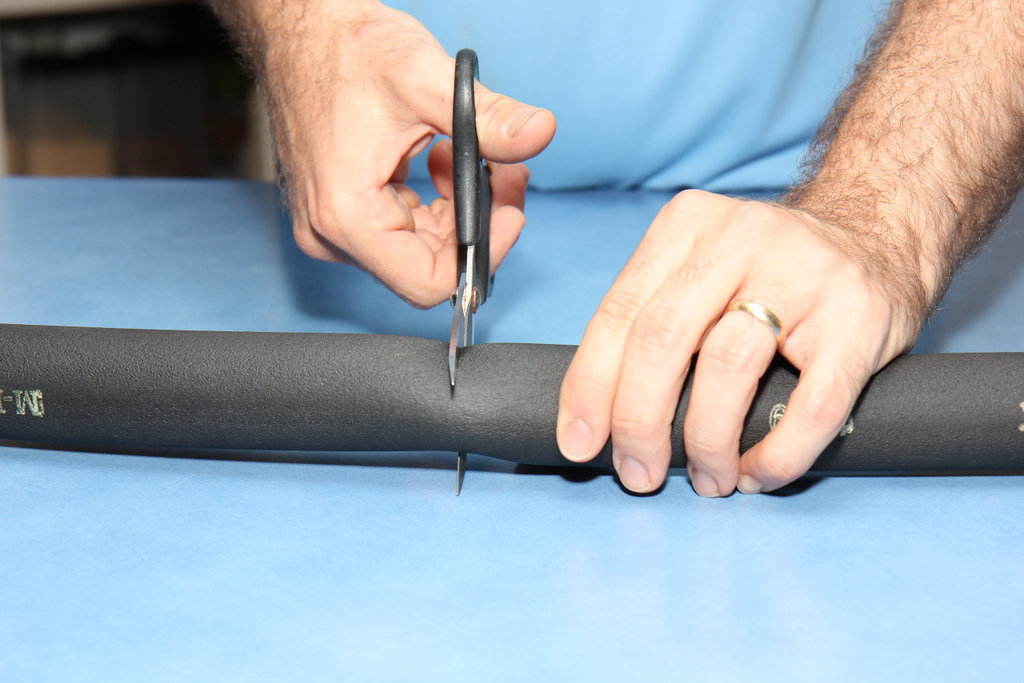
 3. Leave the same spacing at the other end and trim the insulation to size (scissors will do the trick).
4. Cover the entire lightsaber in alfoil, holding it in place with the magic tape. The tape won't be too visible, but try not to go nuts.
5. Overhang the end a bit so you can cover it.

 6. Fold the end over and tape it down.
 7. Alfoil complete.
 8. Cut some cellophane and start wrapping that around it, leaving enough space for the handle.
 9. Roll and tape.
 10. Cellophane done.
11. Wrap a line of black electrical tape around it to separate the blade and handle. Draw on some grip and a few buttons with a black marker. You can use Google images if you want to get really authentic.
Then wrap a layer of clear contact around the whole thing to stop it falling apart soon after the first hit.
12. Voilà! Enjoy the fun!


Notes
  • You may need to do some repairs over time. More clear contact or clear packing tape works well. 
  • Experiment with different colours, sizes and styles and your Star Wars loving kids will have a blast. 

14 November, 2014

What Your Business Name Says About You (An Unscientific Guide)


  • Plumbing & Maintenance Services: "We don't have any imagination, understanding of branding, or time to spend worrying about acronyms..."
  • Bob's Plumbing: "I'm either a friendly local owner-operator, or a multi-national franchise masquerading as one".
  • Freedman, Loorie, Sing, D'Angalo, Longe & Wynded: "We should have thought of a better naming system before taking on new partners".
  • A Cut Above Hair Salon: "We like puns, but we think the jury is still out on originality".
  • Subiaco Plumbing: "If  our business grows, we're either going to limit ourselves or find ourselves increasingly inaccurately named".
  • DynaForce Phantom Shield Excelsior Industries: "We've spent a lot more time thinking about our business name than our business model". 
  • MPMC AmChinCo.: "We're such a massive profit-making conglomerate that it doesn't really matter what our name is anymore". 

08 August, 2014

Payment Options Calculator

So your bill arrives, and there are options of paying in 1, 2 or 4 instalments. Which one is better? The upfront option is cheaper, but since time is money you could be using that money for something else. Plus it's usually easier to budget when your money doesn't go out in big chunks. You can't just do a quick calculation because each instalment is saving you money over a different time period. Then the next day you have to renew your insurance and you have the option of yearly or monthly payments. What to do?

For a while now I've been using this handy little Excel sheet to work it out. I offer it free of charge to hopefully reduce the stress in your life just a little bit and make the world a better (and hopefully nerdier) place.

Download it here.

Please leave a comment and let me know what you think!

18 February, 2014

Cognitive Biases

After reading about cognitive biases, I have decided to coin some of my own:

  • The Fremdenamen Effect: the tendency of things to carry greater credibility when given foreign names. 
  • The Frost Effect: the tendency for concepts named after people to give a misleading first impression. Named after Dr. Frost. 
  • The Grandiloquent Nomenclature Effect: the tendency of things to seem more legitimate when given lofty sounding names. 
  • The Self-Demonstration Effect: the tendency for cognitive biases to be more easily remembered when their name is self-demonstrative. 

17 October, 2013

Candy Crush Saga Advanced Strategy

By now you have probably heard of Candy Crush Saga. It's an addictive colour-matching puzzle game on Facebook and smartphones that has taken the world by storm, earning the creators upwards of $630,000 per day! If you like puzzle games, beware! This isn't affectionately called "Candy Crack" for nothing. It can be highly addictive and many people have spent way too much time on it. But for those willing to take that chance, I have written an advanced strategy guide to help you get ahead. There are already many guides floating around the interweb, but most are quite shallow, explaining basic game mechanics and giving the same basic hints. This guide aims to go a little deeper.

Introduction

For those of you who have played Bejeweled, Candy Crush Saga will at first seem like a cheap knock-off. But rest assured, Candy Crush is not Bejeweled. It's much harder, more challenging and nuanced. Those of you who have mastered Bejeweled will be in for a bad time. After the first few rounds, it's impossible to win just by matching candies of the same colour one at a time. Yet old habits die hard, and you may often find yourself simply matching coloured candies and getting frustrated at your lack of progress. At this point many people have concluded that the game is simply a money making exercise and that you can only win by paying money. However it's this difficulty the makes the game interesting and challenging, and many people (myself included) will tell you that it's perfectly possible to progress through the game without spending any money at all. In fact, this has been my self-imposed goal, and for this advanced strategy guide I will assume that it's your goal too.

Creating Combos

As you quickly learn, combining 4 or 5 candies in different arrangements creates special candies. I will not go into details since it has been covered so well in the following links:
Special Candies Guide
Special Candy Combos
Again, players of Bejeweled may think of these as "bonus combos". However this will just end in frustration. In higher levels is is mathematically impossible to win just by matching the same coloured candies. So it's best to think of these combos as "essential combos" instead. You can't win without them and need to create them wherever possible.

Once you know how to create special candies, it's important to recognise and memorise the arrangements of candies that will let you create a special candy on the next move. This is mentioned in the guides above. However for advanced play, it's useful to think about not just how to create special candies, but how to set up the creation of special candies. This way you increase your chances of winning.

For instance, if you see a horizontal line of two candies (e.g. blues) then a gap, then another 1 or 2 candies, try and keep that structure intact while you drop other candies through the gap. Eventually, a blue may fall into the right spot (or the spot above or below, requiring one further move). You will then have a striped candy or colour bomb. The same thing works vertically as well, in that you try and remove candy on either side so that the right colour candy will drop down into the spot either side of the gap. This is less likely to work than for a horizontal line.

Wrapped candies are harder to create like this, and rely more on luck. However you can look out for a structure that resembles an equal "L" or "T" with a gap, then try and drop candies until they make a match. Thankfully, wrapped candies tend to in general be less usefull than striped candies and colour bombs.

Potential Energy and Cascades

It may be useful to think of the "potential energy" of the board. That is, a board with high potential energy has a lot of matches ready to be made and any matches down low on the board may trigger a cascade of matches. Cascades are excellent because they conserve your moves and increase the chance of getting a special candy. If you have the choice of two moves, one of which will cause a cascade, choose that one.  

To maximise your chances of getting special candies and playing particular moves, you need the right amount of a particular colour in an area of the board. Too few and you won't be able to make any matches. Too many and they will likely be cleared in a cascade and ruin your plans. Keep this in mind when choosing which candies to clear.

Sometimes potential energy will get quite low and there will be few moves available. This often means you get stuck because the only moves available are fairly pointless moves. You will have to keep doing pointless moves until something better happens. Therefore to ensure the board is continually kept fresh and potential energy is kept high, bias your moves towards the bottom of the board. This is more likely to shake up the board than a move at the top of the board, and is more likely to cause cascades.

Also vertical matches shake up the board more than horizontal ones so are best for increasing potential energy. 

If your potential energy is getting very low, it may be best to try and trap yourself with no more moves possible. This will result in the board being shuffled, which is a whole lot better than wasting a lot of moves doing nothing. 

Luck

Like any game that isn't pure strategy,  success = luck + skill. You can't win without both. So don't get too frustrated when you lose over and over again - this is bound to happen. But by increasing your skill, you will get much further ahead than relying on luck alone.

Also like any casino game, the odds are stacked against you. Depending on how the candies fall, it's often impossible to win the level. There is however one advantage you get that isn't available in any casino games I know of. That is, the chance to walk away if you don't like your starting hand. By pressing the "back" key before you make your first move (on any level that isn't timed), you can go back to the level menu and reload the level with new initial positions. On certain levels (clearing chocolate or caged candy), this can mean the difference between winning and losing. If you are getting really stuck on a certain level, "re-rolling" it many times can help. Sometimes you will need to keep re-rolling until:
  1. the ingredient starts in a decent place, not on the outer columns
  2. you have an initial match set up to take out some chocolate, a caged candy or frosting.

Lives

The makers of the game want you to either wait 30 minutes for new lives, or pay $0.99. Well frankly, this bites, so I'm happy to use any method available to bypass this. Here's a trick that involves changing the time on your device that I can confirm works with Android phones.

  1. Go to "Settings"
  2. Go to "Date and Time"
  3. Deselect "Automatic date and time"
  4. Go to "Set date"
  5. Increase the day by 1
  6. Press "Set"
  7. Press the notification from Candy Crush Saga
  8. Press the level you are up to, but don't hit "Play"
  9. Go back to Settings and select "Automatic date and time"
  10. Go back to Candy Crush Saga.

It's best to follow these steps otherwise sometimes the game gets confused and thinks you have something like 1416 minutes (or more!) until you get a new life.

Objectives

Focus on your objectives. It's easy to get distracted matching candies. This is especially important in ingredient levels. These can be cleared easily with a few well-placed vertical striped candies.

Chocolate Tips

Chocolate only grows once per turn. This may seem obvious, but at first I thought it grew on a timer, meaning I rushed a lot of levels I shouldn't have. Try and take it out as quickly as possible, but also don't forget your objectives. It doesn't matter if chocolate takes over half the board if you get your ingredients down.

Chocolate also doesn't grow if you managed to destroy at least one piece that turn. But if you have a match near the chocolate that won't take out any chocolate, do something else and let the chocolate grow that turn. Then do the match when the chocolate is closer and take out some chocolate. Otherwise if you instead do the first match and clear no chocolate, the likelihood is that there is no match available immediately afterwards so the chocolate will grow on both turns.

Bomb Tips

Remember that if you only have 5 moves left, and you have bombs that will explode in 6 or more turns, you can effectively ignore them. Also if you have already reached the points target in a timed level, but are unable to clear a bomb, it's best to stop making moves and let your time run out. That way, the bomb won't explode and you will still pass the level.

Hierarchy of moves:

I've tried to boil all this down into a hierarchy of moves. It's not absolute (there will be exceptions in different situations), but it should be a decent guide on how to play a good strategy.

HIGH
1. Detonating important combos (e.g. massive combos that clear a lot of the board, detonating a vertical striped candy in the same column as an ingredient).
1. Destroying chocolate for good.
MEDIUM
2. Creating special candies.
2. Taking out bombs
2. Unlocking cages candies
2. Setting up future special candy moves (horizontal arrangement)
2. Setting up future special candy moves (vertical arrangement)
2. Taking out some chocolate
LOW
3. Matching candies that will create a cascade.
3. Matching candies down low to shake the board up
3. Matching candies higher up to clear a jelly in a tricky spot.
3. Matching candies higher up (vertically) because you have no other choices .
3. Matching candies higher up (horizontally) because you have no other choices.

Being a Quitter

Consider quitting the game if it looks like it's going nowhere. Remember that luck pays a large part in this game - even with perfect skill you often just can't win. Quitting will save you some time.

Conclusion

Follow these tips and you'll be on your way to becoming a Candy Crush Sage. Do you have any others that I could add to this guide? Please comment below.

21 August, 2013

On Becoming Captain Barnacles - The Construction and Result

Welcome back to my story on becoming Captain Barnacles. As my previous post described, I had decided that a large paper mache head would be required. Seeing as my last paper mache creation was a rather crappy fruit bowl back in high school, I realised some assistance would be required. Thankfully this time the internet provided. Here are some helpful resources I found:

Thankyou internet.
Getting Started with Papier Mache
I used white PVA glue because I didn't want to mess around with flour and water. I would recommend buying the cheap generic version as Aquadhere gets expensive.


For hanging, not wearing
Giant Octonauts Heads
Thanks to this mom-blogger for ideas on how to create the head in a Captain Barnacles style.


Thankyou sir
Papier Mache Brush Technique
The first layer took ages. I used the traditional method of dipping strips of paper into a bucket of glue, squeegeeing them out using my fingers, then spreading them on with my hands. This was messy, slow, and left drips of glue everywhere. I quickly decided that this method was for fools and went searching for a better one. This YouTube video shows exactly that - using a brush to paint the glue on and also to pick up the paper strips. It's much faster and neater as well. Check it out!


Thankyou too.
Geek Techniques: How to Make a Big Head Costume!
This guy had a really useful tip on how to attach the big giant head to your own slightly less giant head - namely, a bicycle helmet tied to a big block of foam. This was really helpful as I was wondering how I was going to put the thing on my head without it tilting and falling off.

Tricks and Steps
Here's a brief summary of how I went about it.


1. Get a giant balloon.
Head
2. Paint on the glue with the brush, then paint on strips of paper and paint glue over them. Tips:
      - If you add a bit of food colouring to the glue, you can see where you have painted. 
      - If you alternate layers of differing types of paper, it will be easy to see where you have gone. 
      - If you make the last layer a layer of white paper it will be much easier to paint. 
      - Use a bucket to stop the thing rolling away. 
Allow each layer to dry overnight before starting the next layer. The number of layers you do should depend on how strong you will need it, however will likely more depend on how much time you have left before the item is needed. I only managed three layers, which for a giant head is probably the minimum. A few more layers would have stopped it caving in (which it did a bit) but was mostly OK.
Painting for fun and not much profit
3. As part of your last layer, cut a section out of two plastic plates and tape them to sides as ears. Mache over them.
I hear you now.
4. Cut the bottom open and peel out the balloon. It will make a cool sound as it peels and shrinks.


Thing
5. Optional step
Captain Barnacles chillin'
6. Tie your bike helmet to a block of foam. As you can see, this was a $4 off-cut from Clark Rubber. Something that was not explained on the link above was how to actually get the twine to go through the block of foam. After thinking about this for a while, I used a bike spoke. The spoke will easily punch through the foam and you can use the little hook on the end to pull the twine through. I suppose you could try with knitting needles too.
Poking through
This is a helmet attached to block of foam. What?
Looking ridiculous
7. Start packing the head with paper, put the foam block in place and then pack more paper around it. Then try it on your head. You will probably need to adjust the location and amount of paper to get it right. A helpful spouse or bystander will be useful at this point to tell you if it's on straight. An unhelpful spouse or bystander will just tell you that you look ridiculous so feel free to poke them in the ribs later. 
Helmut
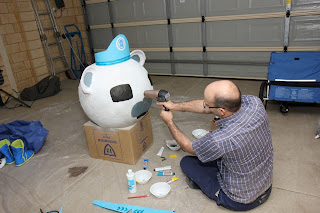
8. Paint. Use a picture of Captain Barnacles from the internet to work out what goes where. I started first with a layer of white spray paint (I was in a hurry because the party was the next morning), but it's also good because it's lighter and won't make the paper as soggy.
Ask the Bunnings worker for "polar bear white" and then film their reaction.
If you are in a hurry, a hairdryer will help speed up the process

"Are you feeling like the outcome of random events will be in your favour, punk? Well, are you?"
9. To make seeing and breathing less difficult, cut out a big mouth in the front. Putting flyscreen over this hole will make it harder for people to see in, but doesn't stop you seeing out.
Mouth

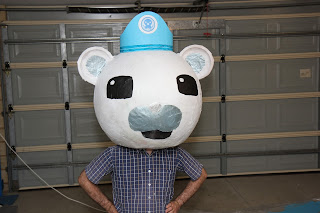
10. The end result. The hat is made from some blue cardboard, and adorned with an Octonauts logo I printed out.
"Ready for action"
Then, just transport the big giant head to the event, gather the other items and you're ready to go!
"Yes occifer I acquired this legally"
To finish it off, use the boots, overalls, belt and gloves detailed here. I covered the belt in blue cardboard, which was a lot easier than painting it. I also made a collar from cardboard as well, which served to hide my neck.

Note that I have also gone around the outline of the non-black areas with a black marker, which helped them stand out a bit and look less messy.

The end result:
"Octonauts, to the launch bay!"
One happy boy

Off on an adventure
The Act
  • Do your research and watch a few episodes of The Octonauts while you are making the head, to make sure you get well into character. 
  • If you have an "Octo-alert" from the children's play set, it will help you make some authentic sounds
  • Make sure you walk and talk in a commanding, confident way. Captain Barnacles always keeps his cool.
  • If you have a treasure chest or similar and fill it with chocolate coins, you can go searching for Calico Jack's Lost Treasure.
If anyone else is mad enough to try this, please let me know how it went. 

Also, does anyone want a big giant Captain Barnacles head? I'm not sure where to put it. The pool room?


14 August, 2013

The (dis) Honest Company - A PR Disaster


I really like watching PR disasters unfold. Perhaps it's a morbid fascination, but it's interesting seeing companies get so wrapped up in themselves that they don't realise what damage they are doing.

Right now, The Honest Company (a Jessica Alba founded company selling expensive but apparently safer baby products) is taking on The Honest Toddler (a hilarious blog and twitter feed written from the perspective of an indignant toddler).

The Honest Toddler has applied for trademark protection and been given provisional approval. However the Honest Company is claiming foul because they registered honesttoddler.com before The Honest Toddler started up. However from my understanding of IP law this case is pretty flimsy since a domain name does not equal a trademark and the Honest Company have never traded commercially under this name. An unfortunate part of IP law is that if you don't aggressively defend your trademark, you will lose rights to it. Of course, that usually seems to involve aggressively attacking anyone that comes remotely close. Or at least those without the legal budget to fight back. The Honest Company is claiming they are friendly and doing what they must, and have "generously" offered to lease the Honest Toddler's name back to them for free for 1 year, after which time they must cease using it. But this doesn't seem very honest or friendly to most people.

All in all, it seems like one of those situations where the big company is listening too much to their legal team and not considering the bigger picture and what they stand to lose compared to any potential gains. The flood of comments on The Honest Company's Facebook page will give you an idea of the amount of negative publicity this has generated.  It seems like a lot of big companies still act like they did before the rise of social media, where they could just get away with ignoring negative feedback and push their positive message hard through advertising. However times and changed and consumers have a lot more choice over what treatment and advertising they will put up with. Hopefully the Honest Company will see some reason soon.

Timeline of events from The Honest Toddler
Statement of events from The Honest Company

07 August, 2013

On Becoming Captain Barnacles - The Gathering


As mentioned in my last post, my new mission is to create a Captain Barnacles costume to appear at my son's birthday party. I set about gathering materials.

    Safety first
  • Suit. I needed a blue jumpsuit. I initially looked at the all-embarrassing jogging onesie, but decided against these because I didn't want to spent so much money on something I would never, ever, use again, and secondly they didn't come in the right colour. So I eventually decided on these disposable overalls.

    Tip: I ordered 2 (in case I managed to tear one), only to find that they come in packs of 4, which is not stated on their website. Would anyone like a free one?


  • Grrrrrr
    Head
    . Probably the defining feature of the Octonauts is their giant head size. Initially I considered a giant inflatable/paper mache head, but couldn't find anything that would work and didn't want to spend time doing paper mache. So in the end, I ordered this:

    Tip: This turned out to be a mistake (see below)


  • Ni Hao!
    Paws
    . These were the best I could find. The head bit doesn't look like Captain Barnacles so I will just tuck that down behind my back and rely on the hands and sleeve part.


  • Shoes. I managed to find some cheap blue "ugg" boots (very polyestery) at Woolies.
  • Belt. $5 black fake leather belt from Red Dot. This will be spray painted.
  • Everything else. I figure I can make all the extra bits (compass, hat, mustache) out of painted cardboard. 
When it all finally arrived and I assembled it, it looked rather silly. I just looked like an anorexic polar bear that had just decided to enter a sludge tank. Realising that the big head would be the most important feature, I decided to make the giant head I first imagined. This was becoming a big project...

Stay tuned for the next episode.

On Becoming Captain Barnacles

"Octonauts, to the launch bay!"
If you're a parent with young children, chances are that you've seen or at least heard of the Octonauts. For those that haven't, it's a children's TV show that's pretty much a cross between Sea Quest DSV and Roger Ramjet (now I'm showing my age).

And as all Octonauts fans will know, Captain Barnacles is biggest, strongest, and coolest of them all. He's pretty much the Chuck Norris of the entire marine-biology-adventure-children's-TV-show scene (It's not a big scene, but still). This may be unrealistic, but I hope to one day be as awesome and in-control as Captain Barnacles.

So when my eldest son decided that he wanted a Octonauts-theme for his 5th birthday, I saw my opportunity. An opportunity to totally excite him, plus indulge my inner, middle and outer nerd and make a costume. A chance to rescue two sea creatures with the one GUP. Seeing as the last time I made a costume was for the midnight preview of Star Wars Episode 2, it's been a while. (The reason why my future wife saw me in this costume and later still agreed to marry me is still up for debate. The "awe" camp has been making ground lately against the "pity" camp. But I digress).

"Octonauts, let's do this!"
Being a father of 3 and consequently lacking in the free time department, I immediately jumped on the internet and typed in "adult Captain Barnacles costume". Much to my dismay, the internet failed me terribly here and the only ready-made costumes available were child-sized. Not to be put-off by this apparent message from the universe that what I was planning was a tiny bit daft, I resolved to make my own. I'll keep this blog updated with photos and tips for anyone who might like to follow in my slightly erratic footsteps.

My wife has been helping by priming my son: "Do you think Captain Barnacles will come to your party?". Being almost 5, he responded with "No mum, they're not real". But you could just hear the slightest hint of doubt and hope in his voice.


25 July, 2013

Yoda is Overrated

This pretty much sums him up
After reflecting on all 6 Star Wars movies, I've come to the conclusion that Yoda is extremely overrated. Don't believe me? Here's why:

Getting things wrong:
Yoda said a lot of things that turned out not to be true. Here's a list:

"If once you start down the dark path, forever will it dominate your destiny, consume you it will, as it did Obi-Wan’s apprentice.”
 “If you end your training now — if you choose the quick and easy path as Vader did — you will become an agent of evil.”

Yoda says these to Luke, who decided not to ignore him, and lo and behold did not turn out as an agent of evil.

Luke: I've got to go to them.
Yoda: Decide you must, how to serve them best. If you leave now, help them you could; but you would destroy all for which they have fought, and suffered. 

Leave now Luke did, help them he may have a little, but destroy all for which they have fought and suffered he certainly did not.

“Do or do not. There is no try.”

As many have pointed out, this is complete bunk. There is very little in this galaxy or the one far, far away that we can't accomplish without trying and failing and trying again regardless.

“At an end your rule is, and not short enough it was!”

This is Yoda's pre-ass-kicking-one-liner before taking on (and losing badly to) Darth Sidious, who then proceeded to rule the galaxy for another 3 movies. And shortly before this:

Darth Sidious: I have waited a long time for this moment, my little green friend. At last, the Jedi are no more.
Yoda: Not if anything to say about it I have! 

Wrong again Yodi.

General Ineffectivenes in Battle
After all this, you would think at least Yoda could redeem himself by doing something awesome in battle. Well the first time you see him fight ever (4 movies in) against Count Dooku, it is pretty impressive. However it's not long before you realise that he's not actually doing anything but jumping around like a rabbit on steroids. He probably could have cut Dooku's legs clean off at least 5 times. Then Dooku manages to leave by toppling a large piece of scenery on Yoda's friends. Yoda takes an inordinate amount of time and straining to stop and move this - clearly he had not yet taken his own advice that "size matters not".

The only other time he fights is against Darth Sidious, and fairly ineffectual he is. Admits his failure later he does.

"Go into exile I must ... failed I have."

It's especially wall-banging as Yoda stands there while Darth Sidious essentially calls his attack...

Darth Sidious: Your arrogance blinds you, Master Yoda. Now you will experience the full power of the dark side. 

... before blasting Yoda with force lightning that inexplicably catches him completely off guard.

Stupid Decisions
OK, OK, so maybe Yoda can't predict the future, or do well in battle, but he's at least wise, right? Or not...

BAIL ORGANA: My wife and I will take the girl. We've always talked of adopting a baby girl. She will be loved with us. 
OBI-WAN: And what of the boy? 
YODA: To Tatooine. To his family, send him. 

I'll leave it to The Editing Room to lampoon this bit:

EWAN MCGREGOR
Wait, really? You mean, to hide him from Hayden and Ian, we're going to allow him to keep the last name Skywalker, bring him to Hayden's birth planet, and put him in the care of his actual relatives? It would take like an hour of research to track him down if the Empire wanted him.
YODA
Well, go watch over him from really far away to make sure he's safe.

Conclusion
I have no idea how Yoda became so esteemed a player on the Jedi council, and he certainly hasn't shown any reasons how he got there. Perhaps so wise because of his speech patterns he does seem.